This page describes how to update the firmware of your hvps-x.
Your current Firmware version

To check the firmware currently running on your hvps-x, launch the GUI and click on the memory button (SD card icon) to display the current settings dialog box. Make a note of the Hardware (PCB version) and Firmware version. In this example: PCB v1.1 and Firmware v1.0. The PCB version is also printed on the board’s silkscreen. The table below shows the compatibility between the software (python GUI/library), the firmware, and the hardware, with the newest version at the top.
| Interface (Software) | Firmware | PCB (Hardware) |
|---|---|---|
| 1.2 | 1.2 | 1.2, 1.3, 1.4 |
| 1.1 | 1.1 | 1.2, 1.3, 1.4 |
| 1.0 | 1.0 | 1.2, 1.3 (with BOM V1.2) |
Note what is the newest software and firmware that is compatible with your hardware version and get this version from the download page.
Saving the settings
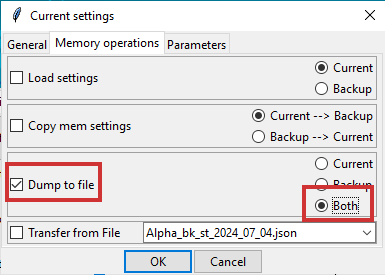
Prior to upgrading the firmware, it is recommended to save the current and back-up settings to files. In memory dialog box, select Dump to file and Both. That way, if the firmware update process or the setting update process fails, you can revert to the previous firmware and reload your settings. It is a good idea to keep one set of settings per firmware version: if you want to downgrade to a previous firmware version and keep your settings (e.g. voltage calibration), you will need to upload a set of setting files matching the firmware version number.
Firmware update
- If you haven’t assembled the board yourself, but got it from us, you will need STM32CubeProgrammer. If you have assembled your own board, you have already used the programmer to flash the firmware.
- If your hvps-x is in a protection box/enclosure, you will need to open the box to access the boot button S3 on the PCB.

- Download the firmware (.hex file) from the Download page.
- Make sure switch S1 (HV Enable) is on position 0.
- Connect the hvps-x to your computer with a USB cable, but do not connect the hvps-x to power at this time.
- Press the Boot push-button (S3) and keep it pressed.
- With the Boot button down, Insert the 13.5V DC power supply plug into the DC Jack J1 to power the board. You can release the boot button now.
- Launch STM32CubeProgrammer
- On the right-hand side of the screen, select USB. If port indicates “no device detected” use the refresh button. If the device manager shows the STM32 Bootloader device, it should be correctly detected at this stage.

- Click ‘Connect’. The left part of the window will show the current content of the memory, which should be 0 everywhere. The bottom of the RHS menu will give information on the micro-controller.

- At the top of the window, select the tab ‘Open File’ and browse to the .hex file of the hvps-x firmware
- Press the button ‘Download’ to send the programme to the micro-controller

- A message ‘File download complete’ will be displayed at the end of the process.
- Optionally, once it is done, you can click on the down arrow of the download button and choose ‘Verify’. This will check that the content of the micro-controller’s memory matches the loaded file.
- Click on disconnect and close the CubeProgrammer.
- Power cycle the device by removing the power plug and inserting it again.


Using the upgraded hvps-x
- Once the hvps-x has rebooted with the new firmware, you can connect it to the GUI. However, each firmware version requires its own version of the GUI/library, as indicated in the compatibility table at the top of the page. For example, if you were using GUI 1.0 and firmware 1.0, and have now upgraded to firmware 1.1, you need to use GUI 1.1.
- The first time the hvps-x reboots after firmware a firmware update, it will update it’s settings. At minimum it will update the firmware version number, but depending on the changes, it may also initialise new settings. Therefore, it is recommended to dump the settings (both current and backup) to files after the update, as they are the required setting files to be uploaded to restore settings post-update.