The release of hvps-x means the end of development and support for the original SHVPS described on this page. The files and instructions remain accessible, but we won’t provide upgrades or support. The reason for stopping support is that we don’t have any SHVPS left to work on, nor any LabVIEW license to work on the user interface. If you want to assemble a high voltage power supply, we recommend our new hvps-x.
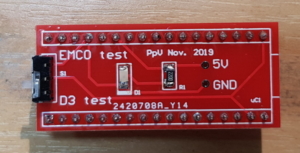
For the low-voltage testing of the board, you need a dummy microcontroller.
There are two ways of assembling the dummy microcontroller:
Using a prototyping board
Make a circuit based on the schematics below:
The side with the arrow goes towards the top of the SHVPS board.
Using a PCB
The files to make the PCB are in the download section. It is included as a project in the Altium file of the HVPS PCB (file LV_tester.PrjPCB), or available in Gerber format. The components you need are listed in the Bill of Material file (BOM-SHVPS.xlsx) available in the download section in the tab “Low-voltage-tester”. It simply consists in a switch, a 220 Ohm resistor, a LED, and 2x 17-pin headers. The two white lines (on the side opposite the switch) represents the USB connector of the real arduino micro and must match the white lines printed on the SHVPS board (i.e. the top of the board).


