The release of hvps-x means the end of development and support for the original SHVPS described on this page. The files and instructions remain accessible, but we won’t provide upgrades or support. The reason for stopping support is that we don’t have any SHVPS left to work on, nor any LabVIEW license to work on the user interface. If you want to assemble a high voltage power supply, we recommend our new hvps-x.
1 Required Hardware
- A single channel HVPS
- Refer to the assembly instructions if you need to assemble a SHVPS
- You need an enclosure to prevent users from accidentally touching the high voltage components. We have an example of a safety enclosure for the SHVPS on this page.
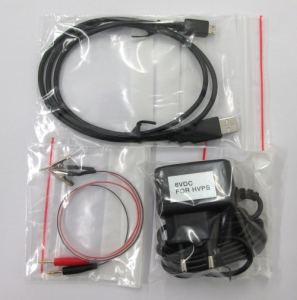
- A USB cable with a USB-micro plug to connect the SHVPS to a computer. Refer to the bill of materials file for a product number (sheet “cables and adapters”).
- A 6V DC adapter to power the SHVPS. Refer to the bill of materials file for a product number (sheet “cables and adapters”).
- A pair of high voltage cables to connect the output of the SHVPS to the external load. Refer to the assembly page, section 6 for instructions on how to assemble the cables.
- A computer with a USB port. Preferably running Windows 7 or later. OSX ok.
2 Required Software
- The drivers to communicate with the Arduino
- The Graphic User Interface
3 Setting up the SHVPS
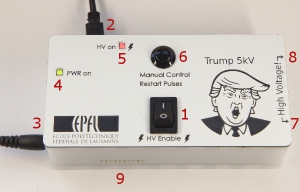
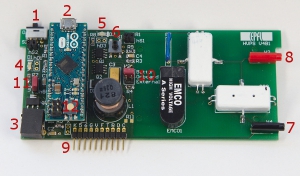
- Place the High Voltage Enable switch (1) in position ‘0’ (this disables the HV converter).
- The High Voltage enable switch should be on the off (0) position whenever you manipulate the HVPS (connect wires to your device, etc).
- Plug in the 6V adapter (3).
- Plug the USB cable (2).
- Connect to the board via the user interface, or your own program. If using your own program, be sure to initialize the HVPS with an output voltage of 0V when it is first connected.
- Place the High Voltage Enable switch (1) in position 1 to enable the HV output.
- Use the HVPS.
- To disconnect the SHVPS
- Place High Voltage Enable switch (1) in position 0
- Quit the user interface by pressing the disconnect button (and not by simply unplugging the USB cable), because a voltage set point of 0V is imposed to the SHVPS when the interface is closed properly. If you are writing your own programme, set a voltage of 0V at the end of the programme for increased safety.
- You can unplug the power cable and USB cable.