The release of hvps-x means the end of development and support for the original SHVPS described on this page. The files and instructions remain accessible, but we won’t provide upgrades or support. The reason for stopping support is that we don’t have any SHVPS left to work on, nor any LabVIEW license to work on the user interface. If you want to assemble a high voltage power supply, we recommend our new hvps-x.
It is assumed that you have connected a configured HVPS to the calibration setup described on the automatic calibration and characterisation page.
The voltage of the HVPS is controlled with a PID regulator. Defaults parameters are defined in the config.ini file for the 5 models of HVPS described on this website (5kV, 3kV, 2kV, 1.2kV, and 500V) and stored into the HVPS when you perform the initial configuration. The parameters are chosen with an emphasis on avoiding voltage overshoots (which can be fatal to Dielectric Elastomer Actuators), rather than on speed. The default parameters can be fine-tuned to you liking.
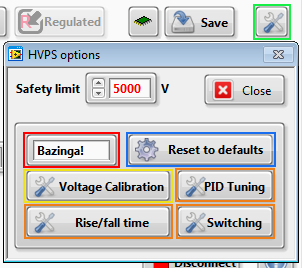
- On the HVPS option dialogue box, press the PID Tuning button.
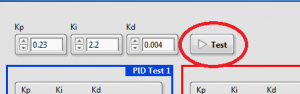
- To perform a test, enter a value for each coefficient (the default values are the current settings stored on the HVPS) and then press the start button.
- The test takes a few seconds. At the end, you should see a curve on the two graphic indicators

The test is done at from 0% to 100% (High amplitude step) and from 0% to 20% (Low amplitude step) of the maximum voltage output. An panel matching the colour of the curve gives indications on the rise time and overshoot of the steps. These parameters are automatically calculated by LabVIEW and are not always logical. - You can repeat tests by changing the parameters Kp, Ki, and Kd and press on the Test button. Up to 5 different tests can be displayed simultaneously on the graphs, which makes it possible to compare different settings.
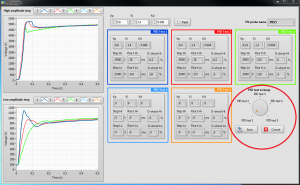
- In the examples above, the blue and red tests are not good, as they lead to voltage overshoot. The green is fine, albeit slower.
- The selector wheel on the bottom right allows you to choose which of the 5 displayed test you want to keep and gives the possibility to store the values of the parameters Kp, Ki, and Kd in the HVPS.
Pressing the Save button:- Saves the PID values of the test selected with the wheel selector “PID test to keep” to the SHVPS EEPROM.
- Saves the data (graph and numerical results) to the excel file
- Closes the window.
Pressing the Cancel button:
- Restores the initial PID value of the HVPS (i.e. the value that were used when the PID testing window was first opened)
- Doesn’t save any result to the excel file
- Closes the window.