The release of hvps-x means the end of development and support for the original SHVPS described on this page. The files and instructions remain accessible, but we won’t provide upgrades or support. The reason for stopping support is that we don’t have any SHVPS left to work on, nor any LabVIEW license to work on the user interface. If you want to assemble a high voltage power supply, we recommend our new hvps-x.
Once you have assembled a board (assembly instructions for HVPS) and placed it in an enclosure (assembly instruction for the minimal enclosure), you need to configure it and calibrate it before it can be used.
The drivers and the LabVIEW user interface or Python user interface must be installed on your computer.
For the SHVPS to work correctly in single-channel mode, the jumper h5V must be in the on position. The header H2 can be changed depending on your usage, but the GUI requires this jumper to be on the Onboard position. Header H2 should only be changed when the board is not powered.
1 Upload the program to the HVPS microcontroller
- Get the most recent firmware from the Download page (shvps_x.zip, where x represents the version), and decompress it on your computer.
- The High Voltage enable switch (S2) must be in the off position.
- Connect the SHVPS to your computer with a micro-USB cable (the power adapter can be used, but is not required at this stage).
- Using the Arduino IDE, compile and upload the code to the microcontroller (see HVPS drivers for more information).
2 Perform the initial configuration
To perform the required initial configuration, you can either use the LabVIEW interface (see 2.1), the Python library (see 2.2), or you can use a simple command (see 2.3).
2.1 Using the LabVIEW interface
- Connect the 6 VDC power adapter to the HVPS.
- Connect the HVPS to the computer with a micro-USB cable.
- Launch the interface. A dialog box will pop-up to attract your attention that the HVPS is not configured
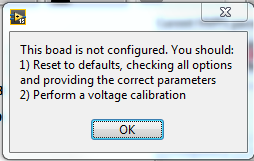
Press OK to close the dialog box - In the GUI select the tool icon (Access HVPS configuration options) at the top right of the window.
- In the dialog box that pops up enter Bazinga! in the password text field to unlock the configuration options
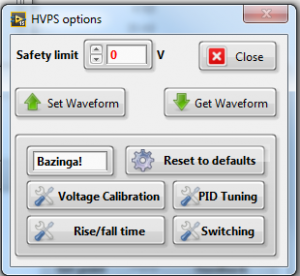
- Press the Reset to defaults button
- In the Dialog box that opens, check all of the options. Enter the value of the I2C address attributed to the HVPS (as defined on the assembly test sheets), the voltage rating of the HVPS, and the name of the board.
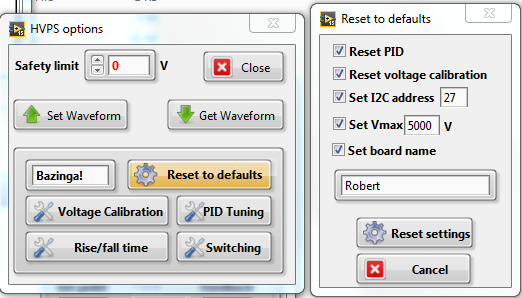
- Press Reset settings to store the parameters in the HVPS
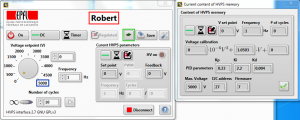
- The main window should display the name of the board (red rectangle). The maximal voltage indicated on the setting dial should correspond to the voltage rating of the HVPS (blue rectangle). You can display the parameters saved into the memory of the HVPS by pressing on the content of the HVPS memory button (green rectangle).
- The HVPS is now ready to be used (refer to the GUI manual), but for better accuracy, it should be calibrated first.
2.2 Python library
The python library provided with the Python user interface enables to perform the initial configuration. The initial configuration cannot be performed with the executable of the Python user interface. You must use the library of function and have Python installed. Refer the the using the source code to run the Python user interface from the source code.
Although the library of functions primarily provides a class to control and interface the HVPS, it also has a main function, the library can therefore be launched as a stand-alone programme for the terminal using the command (might be python3 if you have both python2.x and 3.x installed on your machine):
python3 hvps_lib.py
The main function of the library provides a basic terminal to send direct command to the HVPS. However, if it detects that the connected HVPS is unconfigured, it will propose to perform the initial configuration. Just follow the prompts.
2.3 Direct Command
You can perform the initial configuration of the HVPS with a simple command sent on the serial link:
- Establish a serial connection with the HVPS (refer to direct communication with the HVPS)
- Enter the command Conf XXXX where XXXX is the voltage rating of your board, in order to automatically initialize the HVPS. XXXX must be one of the 5 standard voltage ratings described on the website (5000, 3000, 2000, 1200, or 500). Specifically, the parameters initialised are indicated below. They can all be modified using the serial commands.
- Vmax, the voltage rating of the board, corresponding to parameter XXXX
- C1, the ideal voltage calibration, based on this table (with C2=C0=0)
- Gains Kp, Ki, Kd of the PID regulator
- Name of the board to MyHVPS. Can be changed with SName command once initialisation is done.
- The HVPS is now ready to be used, but for better accuracy, it should be calibrated first.