The release of hvps-x means the end of development and support for the original SHVPS described on this page. The files and instructions remain accessible, but we won’t provide upgrades or support. The reason for stopping support is that we don’t have any SHVPS left to work on, nor any LabVIEW license to work on the user interface. If you want to assemble a high voltage power supply, we recommend our new hvps-x.
Back to the HVPS User Interface
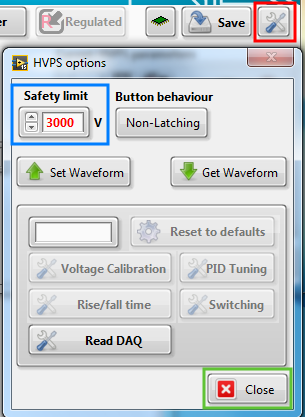
When sensitive devices are connected to the output of a HVPS, such as a dielectric elastomer actuator, it can be desirable to limit the output voltage of the HVPS to prevent against a wrong manipulation on the front panel. This can be done on the HVPS options dialogue, which you can access by clicking the tool button at the top right of the interface (red rectangle).
In the displayed dialogue box, enter the voltage limit into the Safety limit box (blue rectangle), and click on close (green rectangle).
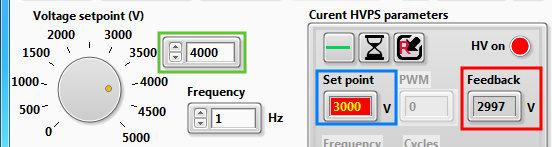
Then, as illustrated on the figure below, when the user enters a voltage set point (green square) higher than the limit, the HVPS limits the set point to the safety value (blue square). The field is blinking to attract the user’s attention to the fact that the chosen set point is not being respected. The feedback voltage (red square) shows that the output voltage is indeed limited to the defined value.
When you define a limiting voltage, it will be enforced the next time you change the voltage set point. For example if the HVPS has a set point of 4kV with no safety limit, and a safety limit is then defined at 3kV, the output voltage will not drop to 3kV. However, next time you change the voltage set point (for example going from 4kV to 3.9 kV), the limit is enforced, and the output voltage drops to 3kV.