The release of hvps-x means the end of development and support for the original SHVPS described on this page. The files and instructions remain accessible, but we won’t provide upgrades or support. The reason for stopping support is that we don’t have any SHVPS left to work on, nor any LabVIEW license to work on the user interface. If you want to assemble a high voltage power supply, we recommend our new hvps-x.
Back to the Python HVPS User Interface
Check Description of the Python interface for an explanation of each control and indicator of the interface
To generate a constant output voltage, use the following configuration:
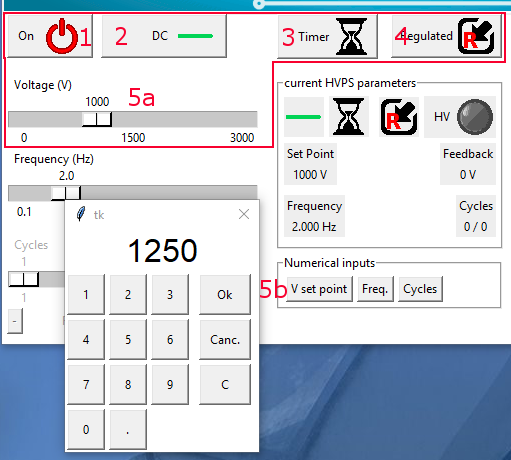
Configuration for DC voltage output
- Source output on (default setting when starting the interface).
- Switching mode: DC mode (default setting when starting the interface).
- Switching source: internal timer.
- Voltage control mode: internal regulated control (this leads to accurate output voltage, according to the calibration file of the HVPS). It should be kept on regulated except for very specific applications.
- Set the desired voltage
a) Using the slider. The resolution of the slider depens on the HVPS voltage rating and is defined in the file config.ini
b) Using the keypad to enter a numerical input. Use the keypad to enter a number that you validate with Ok. Canc. closes the dialogue without taking the new value into account. C clears the entrered value so that you can enter a new one (in case of a typing mistake)
Button (1) allows to easily turn the HVPS on/off, i.e. to toggle the output voltage between the voltage defined in (5) and 0V.
In addition to these settings, the 6VDC power jack must be plugged in, and the high voltage enable switch (s2) must be in position 1 in order to have high voltage at the output.